Talenom is using various authentication and authorization methods depending on the API and / or Application.
Purchases API uses Oauth 2 & OpenId Connect Hybrid flow because we need Client authorization and user authentication to be able to use all the methods.
If are looking documentation for Client Credentials flow, you can read the documentation under topic: "Authorization, Client Credentials"
In this document, we focus on:
Illustration of the hybrid flow actions below
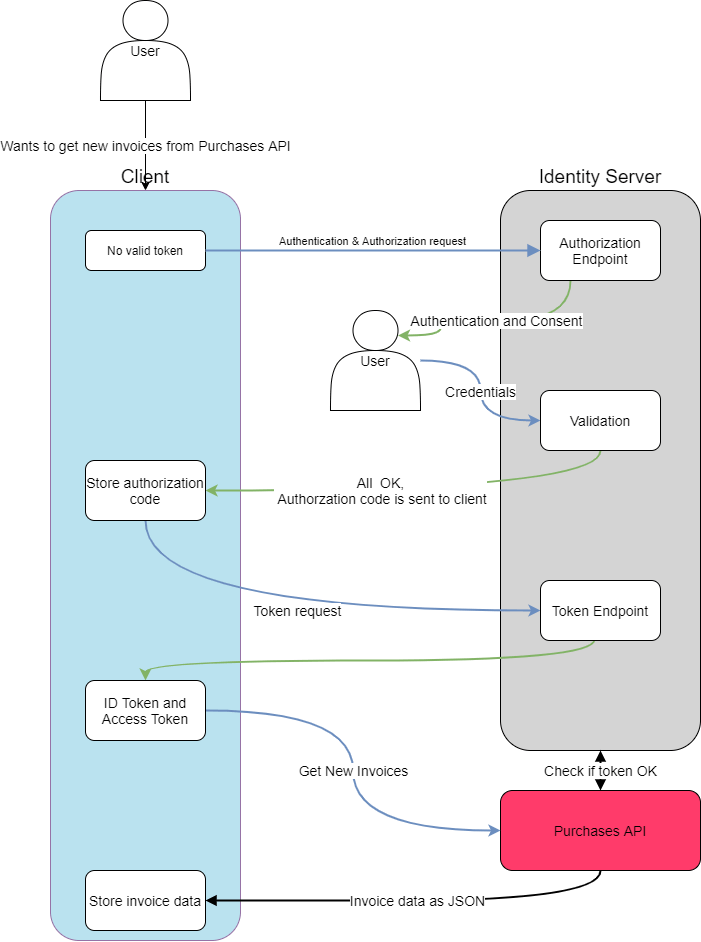
In the flow chart above, we assume that your software (=client) user wants to get purchase invoice data into your software. Below I will explain the whole flow piece-by-piece and show some code blocks of the actual requests sent to our Identity server and purchases API
Also we assume you already have client credentials for your software, which you can request from Talenom Integration services (integraatiot (at) talenom.fi), in this example we use these client credentials:
So, here we go:
1. User clicks on imaginary "Get purchase invoices from Talenom" -button in your software
2. Your client detects that you don't have a valid (or it's expired) token stored for the user in your software, so you will initiate the authentication and authorization process.
3. Your client will send authentication & authorization request to our Identity server which looks something like this:
GET https://idsrv.talenom.fi/identity/connect/authorize?response_type=code+id_token&scope=TalenomPurchasesWebApi+openid+profile+offline_access&redirect_uri=https://yoursoftware.com/callback.php&response_mode=form_post&client_id=purchasesAPITestingClient&nonce=xxx* response_type: code id_token (Tells the authorization server which grant to execute)
* scope: TalenomPurchasesWebApi openid profile offline_access (A space-delimited list of permissions that the application requires)
* redirect_uri: https://yoursoftware.com/callback.php (Holds a URL. A successful response from authorization endpoint results in a redirect to this URL in your software. This needs to be setup for your client by Talenom Integration services when we create a new client credentials for your software. One client can hold multiple redurect_uri's)
* response_mode: form_post (How the result of the authorization request is formatted)
client_id: purchasesAPITestingClient This is the client id for your software what you will get from Talenom integration services when we create a new client credentials for your support. Please contact to integration (at) talenom.fi in case you don't have the credentials.
nonce: xxx (This is kind of signature used in the handshake between identity server and your client. This can be randomized string of letters and numbers, example function in PHP below:
function generateNonce($length)
{
	$chars = "abcdefghijklmopqrstuvwxy0123456789";
	$nonce = "";
	for ($i = 0; $i < $length; $i++)
	{
		$nonce .= $chars[rand(0, strlen($chars) - 1)];
	}
	return $nonce;
}4. If the authorization request is formed correctly and client information is OK, next thing what will happen is that our Identity server will send user to our login and consent screens where user (= a person who holds login credentials in Talenom Online and who has access to purchase invoice data on our system)
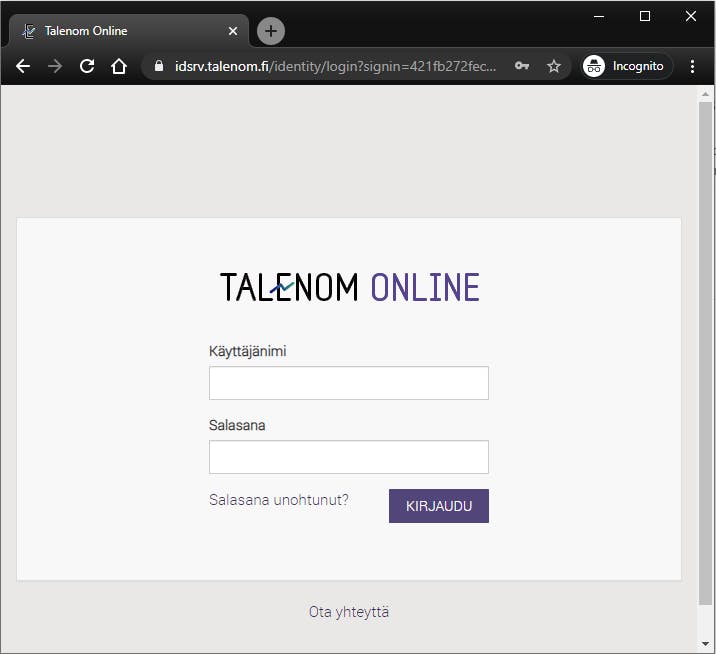
User enters Talenom Online login credentials and hits "Kirjaudu" and will be redirected into consent screen:
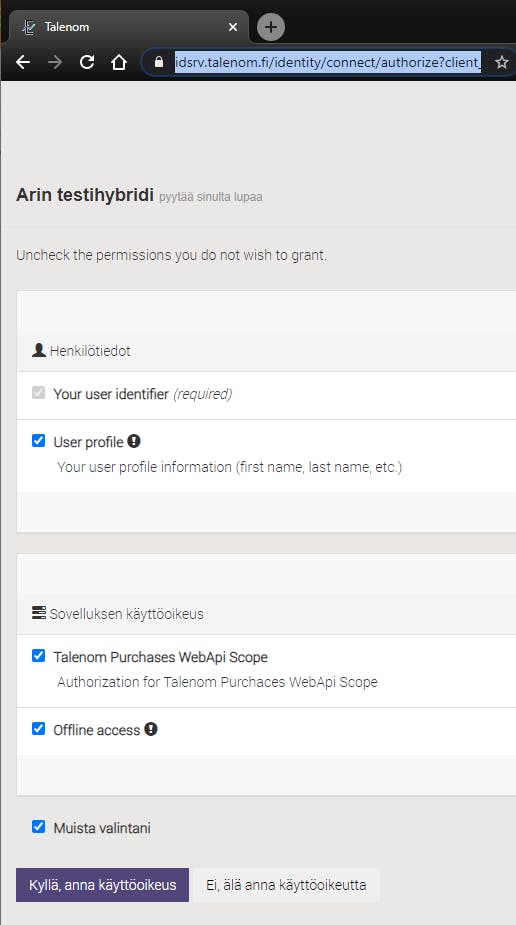
User gives consent for your client to use his/their purchase invoice data from the API
5. If user log's in with valid credentials and gives the consent, our identity server will then send authorization code in the response to the client. Store this code in the session so you can use it in the next request.
Response body should look like this:
{
	"code": "eb0690bxxxxxx123456xxxx789x45663298d2ff4c", --- This is the authorization code
	"id_token": "eyJ0eXAiOiJKV1QiLCJhbGciOiJSUzI1NiIsIng1dCXXXXXxxxxxXXXXXXXXxxxxXXX42R3V0ZyIsImtpZCI6IlRVbG9iMDljN1F6UUptYklEX3VGMm42R3V0ZyJ9.eyJpc3MiOiJodHRwczovL2lkc3J2LnRhbGVub20uZmkvaWRlbnRpdHkiLCJhdWQiOiJBcmluVGVzdGlIeWJyaWRpIiwiZXhwIjoxNjAxMjgxNjA1LCJuYmYiOjE2MDEyODEzMDUsIm5vbmNlIjoiYjN2dTh1OHRibW1hZ3h5Zng5YjZrY213MHEwa2U1M3YiLCJpYXQiOjE2MDEyODEzMDUsImNfaGFzaCI6IlpzQzE2R3oyd2JKM1dtX3RIVGt6ekEiLCJzaWQiOiJkZDcwZWI2N2U0NjVmMDBmMDI4NXXxxxXXXXXxxxXXXnN1YiI6IjE1N2M4ZDJhLTVjNWYtNDY1OS05NDE3LTJjMzg0N2I0NTQ1ZCIsImF1dGhfdGltZSI6MTYwMTI4MDg5MSwiaWRwIjoiaWRzcnYiLCJhbXIiOlsicGFzc3dvcmQiXX0.I7ZgymgQmj7UVL1LGXsFxk5T6zQybIQSTu1DBF0ZXQTUaxQji7IRrq_U6AOG40Fg2Xw-q5LF-xt_2AMO9NvGxjuljzetaP8XXXXxxxxxxXXXXXXXX8tTKEb_J38rGQjNuEh-xUCYgiWHyWYRAjXxE0U0pEhpyBEFvQTXOBMbOOa-ZmZMiXYgP9BVUZh0rR9z5cSII6e22nDG7tohFe4R5NKxW3BN2guOvkGJnROKer-1IvKC8Qyl69Hmwmw7-n-aHP3zCFF9oPzd-dAxGGdcu7R8oIPcJWfJaI6-mLkBoGfvA",
	"scope": "TalenomPurchasesWebApi openid profile offline_access",
	"session_state": "4XN_sb4kLj99XXxxxD2211gfP1wulmJsNkI.b43da94bfb379b457a56871f941cfc8c"
}6. Make request to get access token from token endpoint, query should look something like this:
Headers:
Authorization: Basic cHVyY2hhc2VzQVBJVGVzdGluZ0NsaWVudDpzdXBlci5zZWNyZXRLajRuY29rbTQ
Content-Type: application/x-www-form-urlencoded
Accept: application/json

POST https://idsrv.talenom.fi/identity/connect/token

Body:
{
	code: ADKLSJANM;Rnfjidmikl55n2mlkmr3nr_etc..,
	redirect_uri: https://yoursoftware.com/callback.php,
	grant_type: authorization_code
}Headers:
* Authorization: Basic cHVyY2hhc2VzQVBJVGVzdGluZ0NsaWVudDpzdXBlci5zZWNyZXRLajRuY29rbTQ (This contains text "Basic" without quotes and base64 encoded ClientId and Client Secret with colon (:) in between, so in this case: purchasesAPITestingClient:super.secretKj4ncokm4 to base64 encoded is: cHVyY2hhc2VzQVBJVGVzdGluZ0NsaWVudDpzdXBlci5zZWNyZXRLajRuY29rbTQ
* Content-Type: application/x-www-form-urlencoded (With this content type keys and values are encoded in key-value tuples separated by '&', with a'='between the key and the value.
* Accept: application/json (You tell our server to return response in json )
Body:
code: XXXXXX.... (The authorization code you got from the first authentication session)
redirect_uri: https://yoursoftware.com/callback.php, (Same as in previous request)
grant_type: authorization_code (Tells the authorization server which grant to execute)
Response body looks like this:
{
	"id_token": "eyJ0eXAiOiJKV1QiLrKueHJOYYYYYYYYYYYYYYYYYYYYYYYYYYYY",
	"access_token": "eyJ0eXAiOXXXXXXXXXXXXXXXXXXXXXXXX",
	"expires_in": 3600,
	"token_type": "Bearer",
	"refresh_token": "a8651fd7e49fdda123456789d2db701b00"
}7. If you got the response like above, now you should be able to make your first request to actual API using the access_token like this:
Headers:
Accept: application/json
Authorization: Bearer eyJ0eXAiOXXXXXXXXXXXXXXXXXXXXXXXX

GET https://purchasestesting.talenom.fi/v1/invoices?customerNumber=14222
And in response you should get something like this:
{
    "Items": [{
            "version": 799200913,
            "seller": {
                "businessId": "1234567-1",
                "organisationName": "Kopiokonekauppa Oy",
                "additionalName": null,
                "bankAccount": {
                    "bankName": "",
                    "bankAddress": null,
                    "iban": "FI2112345600000785",
                    "bic": "NDEAFIHH"
                }
            },
            "buyer": {
                "businessId": "7654321-0",
                "organisationName": "Tietoväylä Demoyritys",
                "additionalName": null,
                "postalAddress": {
                    "streetName": [
                        "Yrttipellontie  2"
                    ],
                    "townName": "OULU",
                    "postCode": "90230 ",
                    "countryCode": "FI",
                    "postOfficeBoxId": null
                },
                ...etc..
            }
        }
    ]}
If you got the response, Congratulations, you made it!
There is possibility to keep the token alive programmatically using the refresh tokens, more details about it can be found from here: https://openid.net/specs/openid-connect-core-1_0.html#RefreshTokens
Send us a message, we will respond as soon as possible.